Google Analytics is one of the best and most popular reporting tools available on the internet today and best of all it’s 100% free!
It allows you to track almost everything including…
Which websites are referring you traffic.
Where your visitors are psychically located.
How long people spend on your website.
What they actually do on your website.
How users access your website (Desktop, Mobile, etc).
… and much much more!
To access to Google Analytics you need to have a Google account.
– If you already have a Google account you can access Google Analytics by clicking here.
– If you do not have a Google account you will need to create one by clicking here.
How to Setup Google Analytics for your Website
Once you have access to Google Analytics you will need to create a new account to will link with your website.
There are two ways to do this:
* Note: The below screenshot will assist you in locating the items in steps 1 and 2.
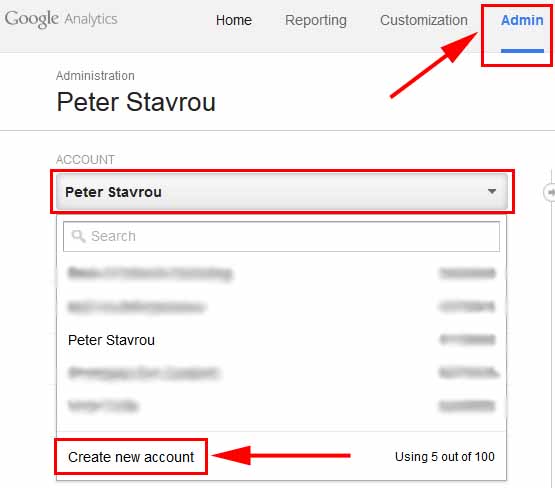
1. At the top of the page click in Admin.
2. Under account click on Create new account.
3. Fill in the required information and click on the blue Get Tracking ID button at the bottom.
4. Accept to the Google Analytics Terms of Service Agreement.
5. You will be asked to copy and paste your tracking code into every page you would like to track, however, you can ignore this step as I will be showing you a much easier and more effective way to track and monitoring your website visits.
How to Link Google Analytics with WordPress
Now that you have access to Google Analytics, I am going to show you how to quickly link your WordPress website with your Analytics account so you can start tracking and monitoring all of your web traffic.
Instead of following Google’s complicated instructions to place a piece of code into every page you want to track, you can simply use the plugin Google Analytics by Yoast to make the linking process much easier.
Along with the installation of the plugin you will also gain some pretty neat analytical features in the admin area of your WordPress site.
If you are looking for something a little more advanced, I recommend you take a look at how to track anything using Google Tag Manager.
How to Setup Google Analytics by Yoast for WordPress
1. Install and Activate the plugin Google Analytics by Yoast.
* Note: The below screenshot will assist you in locating the items in steps 2 and 3.
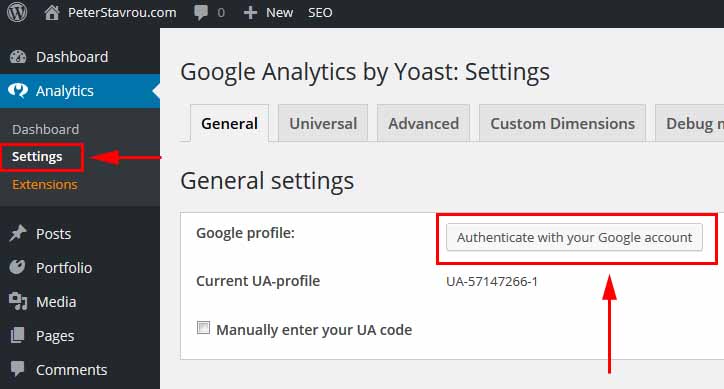
2. On the left-hand side of the admin panel click on Analytics and then on Settings.
3. Click on Authenticate with your Google account.
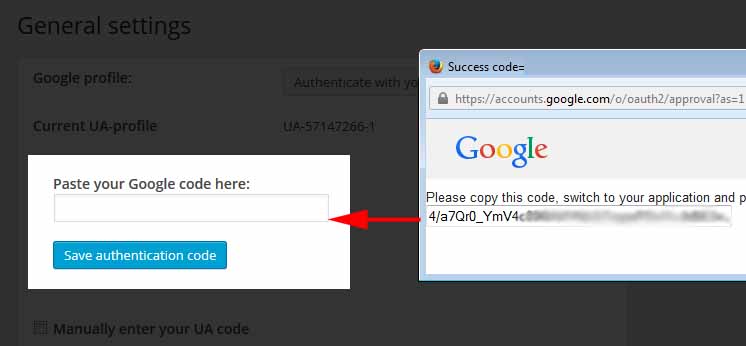
4. Once a Window pops-up saying Google Analytics by Yoast would like to… click on the blue Accept button
5. Copy and paste the code you are given into Google Analytics by Yoast and click on the blue Save authentication code button.
6. In the Analytics profile box select your website to link it with your Google Analytics account and press Save changes.
There are a few settings in the plugin that you can change, however, I usually leave these as default.
Now that your Google Analytics has been set-up you can access some statistics within your WordPress by clicking on Analytics and then on Dashboard.
If you would like to see in-depth statistics you will need to access your Google Analytics account and click on the All Web Site Data link.
Did you know that there are spammers out there who really mess-up the accuracy of your Google Analytics Data?
Click here to learn how to remove these spammers from your Google Analytics Reports.