Wouldn’t it be awesome if you could track exactly what links your users click on within your website and display them in Google Analytics? By tracking your links you can see what pages and/or products are most popular and structure your marketing accordingly.
There are many websites out there that teach you how to track links using an event tracking code from Google Analytics but this method is very outdated.
In this tutorial you will learn how to use Google Tag Manager with Google Analytics to track Affiliate Links, WooCommerce Product Clicks, External Link Clicks and any other Link or Element you would like to track.
Table Of Contents:
1. What is Google Tag Manager?
2. How To Set-up And Install Google Tag Manager
2.1. How To Install Google Tag Manager On WordPress
2.2. How To Test Your Google Tag Manager Installation
2.3 Known Issue: Unable To Install Google Tag Manager On WordPress
3. How To Enable Additional Variables
4. How To Install Google Analytics With Google Tag Manager
4.1 Test Your Google Analytics Setup
5. How To Cloak Affiliate Links And Why
5.1. How To Track Affiliate Link Clicks
5.2. Test Your Affiliate Link Tracking Setup
6. How To Track WooCommerce Product Link Clicks
6.1. Test Your WooCommerce Product Tracking Setup
7. How To Track External Link Clicks
7.1. Test Your External Link Tracking Setup
8. How To Track Any Element
8.1. Test Your Element Tracking Setup
9. How To View Tracked Data In Google Analytics
10. Setting Up Your Tracked Data As Goals
1. What is Google Tag Manager?
Google Tag Manager is a free tool that allows you to add and manage snippets of code on your website from a central location, without needing to continuously modify your website.
For example, most websites use Google Analytics to monitor their traffic data and a Facebook Conversion Pixel to re-target anyone who has visited their website with Facebook Ads.
To add Google Analytics and a Facebook Pixel to your website you usually need to add two snippets of code to your website, one for Google Analytics and another for the Facebook Pixel.
Google Tag Manager allows you to add both snippets of code from a central location which means you do not need to edit the code on your website directly.
This may sound confusing at the moment but you will completely understand how it works by the end of this tutorial.
2. How To Set-up And Install Google Tag Manager
To use Google Tag Manager, you will first need to create an account and then install it on your website.
You will be using your Google account to setup the Tag Manager and for best practice it’s recommended that you use the same account that you used to setup Google Analytics.
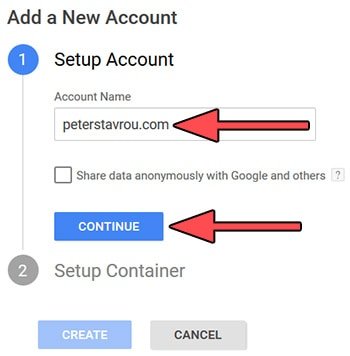
1. Go to https://tagmanager.google.com and click on CREATE ACCOUNT to create a container.

2. Type in an account name and press CONTINUE.
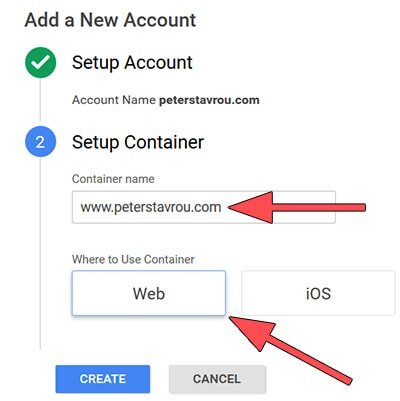
3. Enter your website URL, select Web and press CREATE.
4. Accept the Google Tag Manager Terms of Service Agreement.
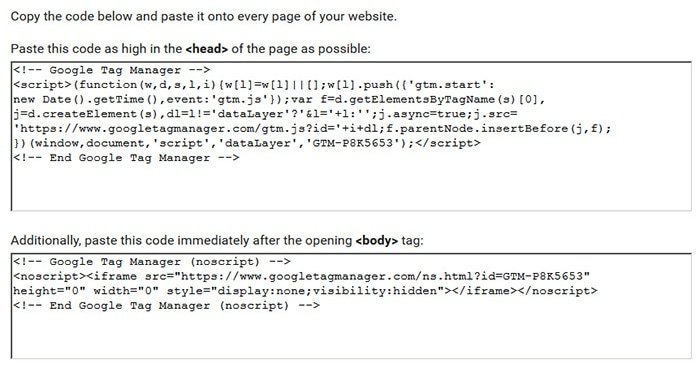
5. You will be given two snippets of code that you need to add to your website to install the Tag Manager.
2.1. How To Install Google Tag Manager on WordPress
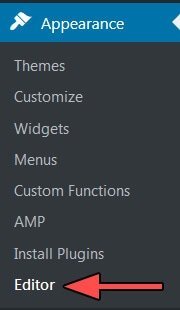
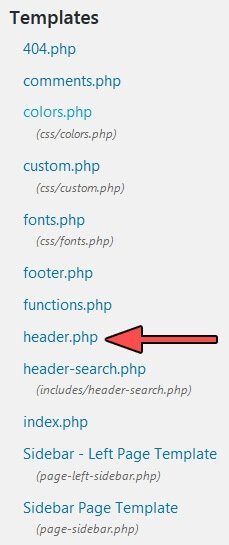
To install the Google Tag Manger on your WordPress site you will need to edit your header.php file.
The easiest way to access header.php is to go to Appearance, Editor and then click on header.php on the left-hand side.
It’s important to note that when you are making changes to your Theme, it is highly recommended that you use a Child Theme. By using a Child Theme, you can update your Theme while keeping all of the modifications you have made.
If you add the code directly to your Theme, it will be overwritten next time you update it and you will need to re-add your custom code.
1. Copy the first bit of code and paste it directly under
.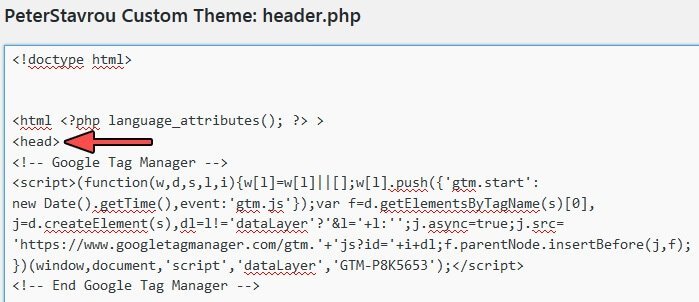
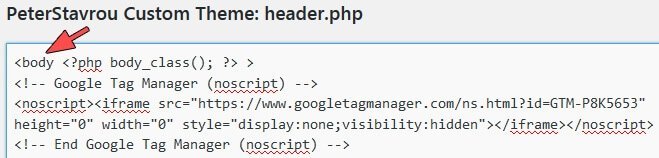
2. Copy the second bit of code directly after <body>.
Please note that your <body> tag may look slightly different to mine.
To find the tag simply do a search for <body
2.2. How To Test Your Google Tag Manager Installation
Once you have installed Google Tag Manager, it is important to test it to ensure that it has been installed successfully.
To test the installation you will need to use Google Chrome and install the extension Tag Assistant (by Google)
Once you have installed Tag Assistant (by Google), you will notice a little blue icon in the corner of your web browser.
![]()
Navigate to your website, click on it and then click on Enable.
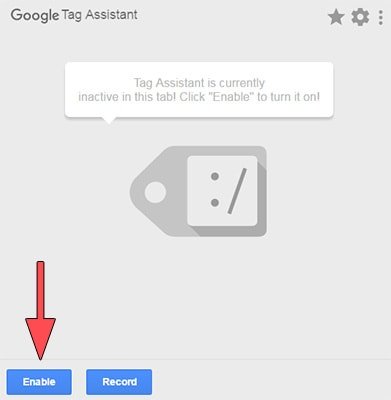
Once enabled, refresh the page (use the F5 key as a shortcut) and if the icon turns Green it means that the installation was successful.
2.3. Known Issue: Unable To Install Google Tag Manager On WordPress
If you have successfully installed the Tag Manager then please proceed to the next section (How To Enable Addition Variables).
When I first installed Google Tag Manager on my WordPress site, I experienced an issue where the Google Chrome Tag Assistant extension was unable to detect an installation. I was 100% certain that I had installed it correctly and after a few days of troubleshooting I discovered that the issue was being caused by the W3 Total Cache plugin.
You may experience the same issue with similar Caching plugins, so if you are certain that you installed the Google Tag Manager correctly but the Chrome Tag Assistant is unable to detect the installation then try the below solution.
1. Go to the header.php file and locate the Google Tag Manager snippet code that you previously pasted.
2. Find this bit of code: https://www.googletagmanager.com/gtm.js?id=’+i+dl
3. Replace it with https://www.googletagmanager.com/gtm.‘+’js?id=’+i+dl
By changing the Tag Manager script slightly, you can make it so that caching plugins such as W3 Total Cache do not recognize the path to the JavaScript file and therefore does not mess-up the code.
3. How To Enable Additional Variables
To unleash the full potential of Google Tag Manager you will need to enable additional variables, this will grant you much more flexibility and allow you to track anything on your website.
Click on Variables and then on the red CONFIGURE button.
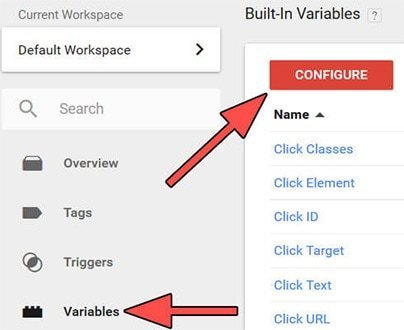
By default the below variables are enabled.
Page URL
Page Hostname
Page Path
Referrer
Event
It is highly recommended that you also enable the below variables.
Utilities
Container ID
Random Number
Errors
Error Message
Clicks
Click Element
Click Classes
Click ID
Click Target
Click URL
Click Text
Forms
Form Element
Form Classes
Form ID
Form Target
Form URL
Form Text
4. How To Install Google Analytics With Google Tag Manager
Above we discussed how you can install Google Analytics and various other scripts on to your website without having to login to edit your code or needing to install additional plugins.
Let’s go a head and install Google Analytics on to your website with Google Tag Manager.
1. Login to Google Tag Manager and click on the container you created.
This will take you to the WORKPLACE tab.
1. Click on Tags and then on the red New button.
2. Give your Tag a name, I named mine Google Analytics.
3. Click on the Tag Configuration box and select Universal Analytics.
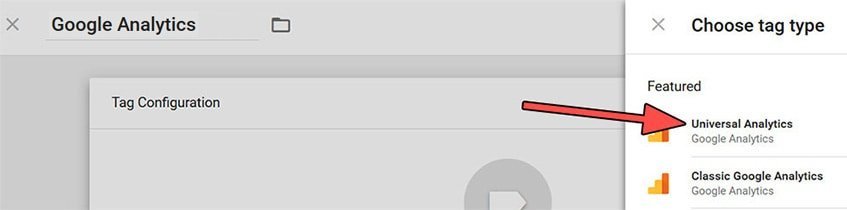
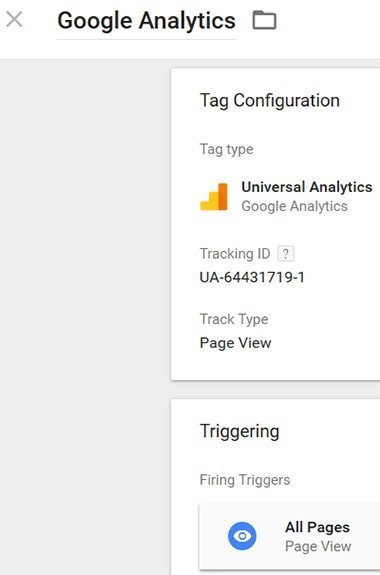
4. Enter your Google Analytics Tracking ID.
If you are unsure what your tracking ID is then login in to your Google Analytics and look at the number next to your Property.

5. Set Track Type to Page View.
6. Scroll down and click on the Triggering box and select All Pages.

Your setup should now look similar to this:
Once your done click the blue Save button.
Now that you have setup your Google Analytics Tag you will need to test it.
4.1. Test Your Google Analytics Setup
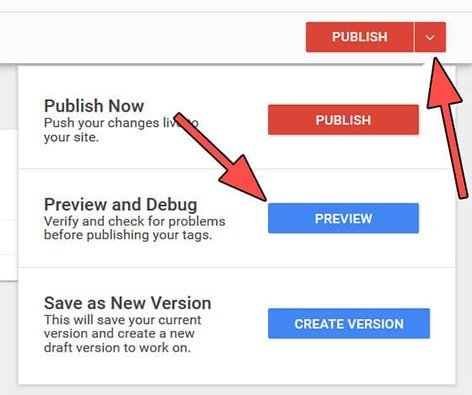
1. Click the red down arrow next to the PUBLISH Button.
2. Click on PREVIEW.
3. Open a new tab in web browser and go to any page on your website.
4. A Google Tag manager box should pop-up at the bottom of your website.
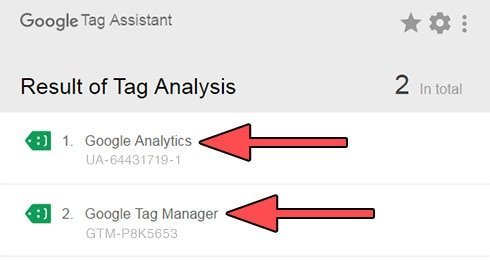
5. You should see your Google Analytics Tag under Tags Fired On This Page.
This means the installation is working correctly.

6. Go back to Google Tag Manager and press the red PUBLISH button to make the installation live.
7. Once you have published the Tag, you can then use the Tag Assistant extension that we discussed earlier to double-check that Google Analytics is working correctly.
5. How To Cloak Affiliate Links And Why
Before you start tracking your affiliate links, you need to ensure that you are cloaking them (also known as masking) and that they all use the same URL structure.
This will allow your affiliate links to blend in with the rest of your content and simultaneously help you make more money online with affiliate marketing.
To cloak your affiliate links I recommend you use the plugin ThirstyAffiliates as it allows you to change the link to include your URL.
You can of course use URL shorteners such as Bitly but by using ThirstyAffiliates you can blend in your affiliate links with your content much better.
For example, my affiliate link for Thrive Themes is thrivethemes.com/affiliates/ref.php?id=4271.
By using ThirstyAffiliates I was able to change the link to peterstavrou.com/get/thrivethemes/.
If you click on the links you will notice that they both go to the same website.
Pro Tip: Google recommends that you NoFollow affiliate links and ThirstyAffiliates gives you the option to do this automatically when you insert them.
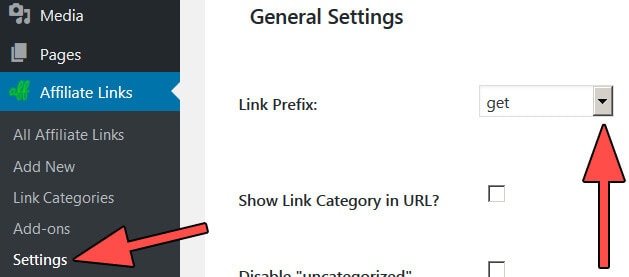
ThristyAffiliates has 18 different URL structures (Link Prefix) you can choosefrom and you can even create your own.
To set your URL structure for your affiliate links, go to Affiliate Links, click on Settings and then select the Link Prefix you would like to use.
5.1. How To Track Affiliate Link Clicks
After you have installed ThirstyAffiliates, Google Tag Manager and enabled the additional variables, you can begin setting up your affiliate link tracking.
1. Login to your Google Tag Manager account and click on the container you previously created which will take you to the WORKPLACE tab.
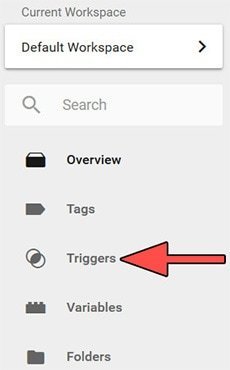
2. Click on Triggers and then on the red New button.
3. Give the Untitled Trigger a descriptive name, I named mine Affiliate Links.

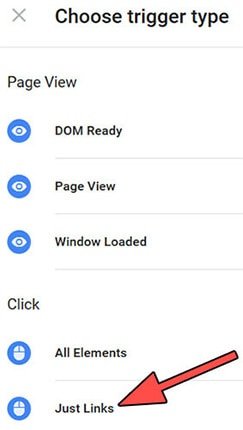
4. Click on the Trigger Configuration box and then click on Just Links.
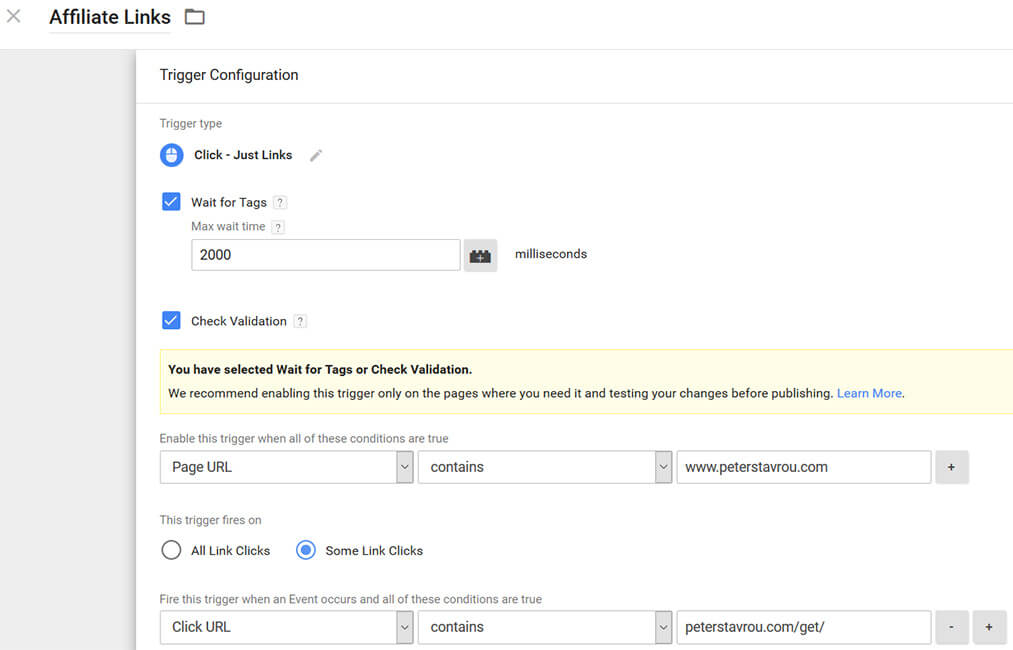
5. Check Wait for Tags and Check Validation.
(Screenshot of complete setup below)
6. Under Enable this trigger when all of these conditions are true select Page URL | Contains and enter your website URL.
(Screenshot of complete setup below)
7. Under This trigger fires on select Some Link Clicks.
(Screenshot of complete setup below)
8. Under Fire this trigger when an Event occurs and all of these conditions are true select Click URL | Contains and enter the URL Prefix you chose for your affiliate links.
For example, I set my URL Prefix in ThirstyAffiliates to be peterstavrou.com/get/.
If you decided not to use the ThirstyAffiliates plugin and instead you are using a URL shortener such as Bitly, then enter bit.ly/
If you are unable to see Click URL in the drop-down box then you will need to go enable it in Variables (discussed above).
Your setup should now look very similar to this:
Once your done click the Save button in the top-right corner.
You have now setup a Trigger that tells Google Tag Manager when to record a click.
You now need to setup a Tag so that the recorded click gets sent to your Google Analytics account.
1. Click on Tags and then on the red New button.
2. Give your Tag a name, I named mine GA – Event – Affiliate Links because we are sending clicks to Google Analytics and we are using an Event to track it.
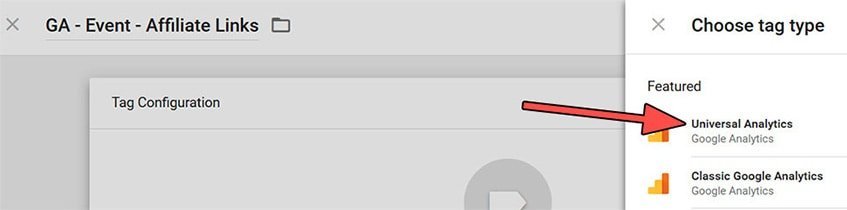
3. Click on the Tag Configuration box and select Universal Analytics.
4. Enter your Google Analytics Tracking ID.
You can find your tracking ID by login in to Google Analytics and looking at the number next to your Property.
5. Under Track Type select Event.
6. Under Category type Affiliate Links.
This is the category name that will appear in your Google Analytics.
7. Under Action click on the + icon and select Click URL or simply type {{Click URL}}.
8. Under Label click on the + icon and select Path Path or simply type {{Page Path}}.
9. Scroll down and click on the Triggering box and select the Trigger you previously created (Affiliate Links).

Your setup should now look similar to this:
![]()
Once your done click the blue Save button.
Now that you have setup your Tag and Trigger you are ready to test them.
5.2. Test Your Affiliate Link Tracking Setup
1. Click the red down arrow next to the PUBLISH Button.
2. Click on PREVIEW.
3. Open a new Tab and go to a page on your website where you have an affiliate link.
4. A Google Tag manager box should pop-up at the bottom of your website.
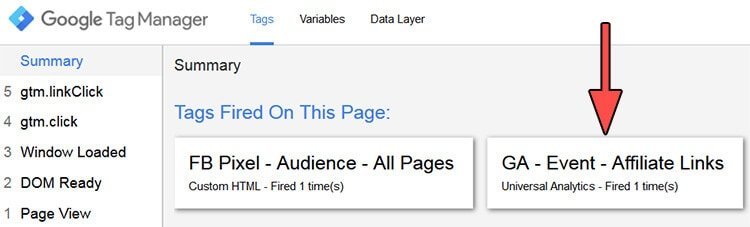
5. Click on your affiliate link and you should see your Tag appear under Tags Fired On This Page.
This means your affiliate tracking is working correctly.
You can also click on the box to see some more information.
6. Go back to Google Tag Manager and press the red PUBLISH button to make it live on your website.
6. How To Track WooCommerce Product Link Clicks
Tracking WooCommerce Product Link Clicks is very similar to tracking Affiliate Links.
After you have installed the Google Tag Manager and enabled the additional variables, you can start to setup your WooCommerce Product click tracking.
1. Login to Google Tag Manager and click on the container you previously created.
This should take you to the WORKPLACE tab.
2. Click on Triggers and then on the red New button.
3. Give your Trigger a name, I named mine WooCommerce Product Links.
4. Click on the Trigger Configuration box and then click on Just Links.
5. Tick the options Wait for Tags and Check Validation.
(Screenshot of complete setup below)
6. Under Enable this trigger when all of these conditions are true select Page URL | Contains and type your website URL.
(Screenshot of complete setup below)
7. Under This trigger fires on select Some Link Clicks.
(Screenshot of complete setup below)
8. Under Fire this trigger when an Event occurs and all of these conditions are true select Click URL | Contains and enter YourWebsite.com/product/
(Screenshot of complete setup below)
If you cannot find Click URL in the drop-down box then you will need to go enable it in Variables (discussed above).
9. Your Trigger page should look like this:
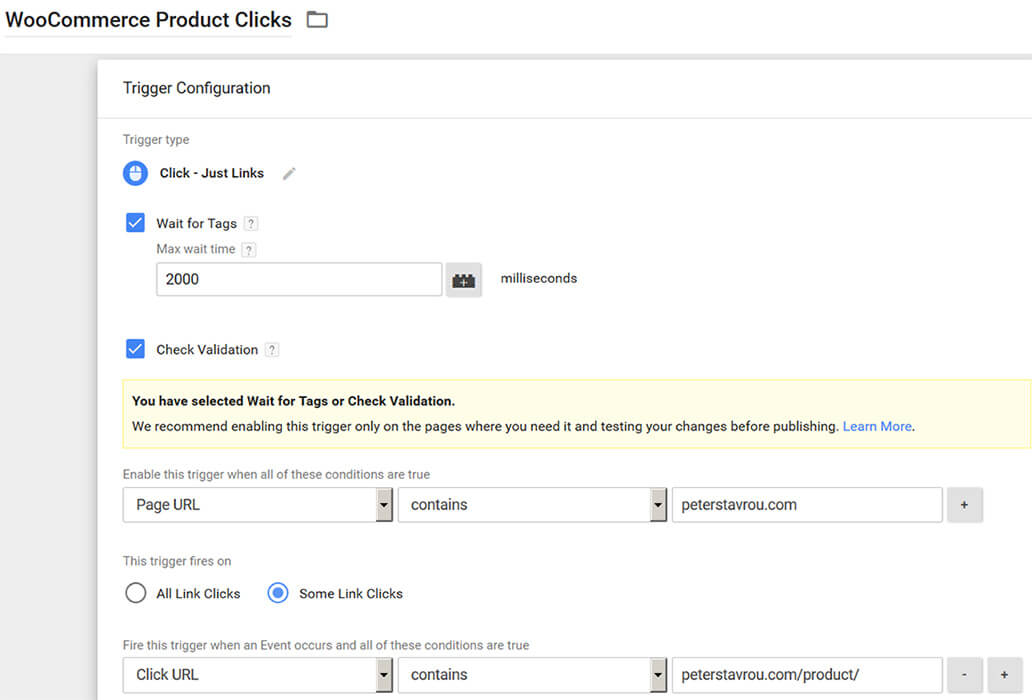
Once you have finished, click the Save button in the top-right corner.
The Trigger allows you to control when and how a Tag runs.
You now need to setup a Tag which will be used to send the recorded click to your Google Analytics account.
1. Click on Tags and then on the red New button.
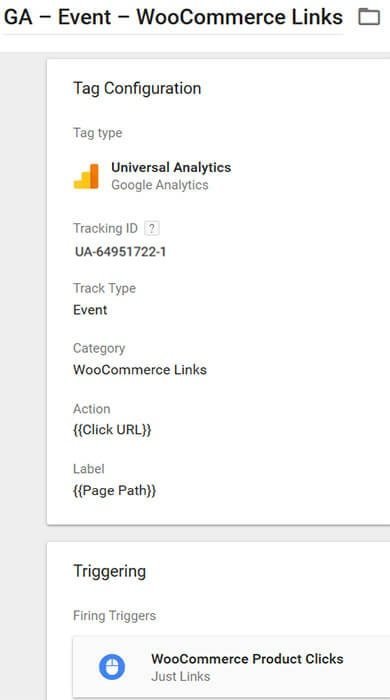
2. Give your Tag a name, I named mine GA – Event – WooCommerce Links because we are sending clicks to Google Analytics and we are using an Event to track it.
3. Click on the Tag Configuration box and select Universal Analytics.
4. Enter your Google Analytics Tracking ID.
Your Tracking ID is the number next to your Property in Google Analytics.
5. Under Track Type select Event.
6. Under Category enter WooCommerce Links.
This is the category name that will be shown in your Google Analytics.
7. Below Action click on the + icon and select Click URL or simply enter {{Click URL}}.
8. Below Label click on the + icon and select Path Path or simply enter {{Page Path}}.
9. Scroll down and click on the Triggering box and select the Trigger you previously created (WooCommerce Product Links).

You’re setup should now look similar to this:
6.1. Test Your WooCommerce Product Tracking Setup
1. Click the red down arrow next to the PUBLISH Button.
2. Click on PREVIEW.
3. Open a new Tab and go to your WooCommerce Shop page.
4. A Google Tag manager box should pop-up at the bottom of your website.
5. Click on one of your Products in your shop and you should see your Tag appear under Tags Fired On This Page. This means your WooCommerce product click tracking is working correctly.
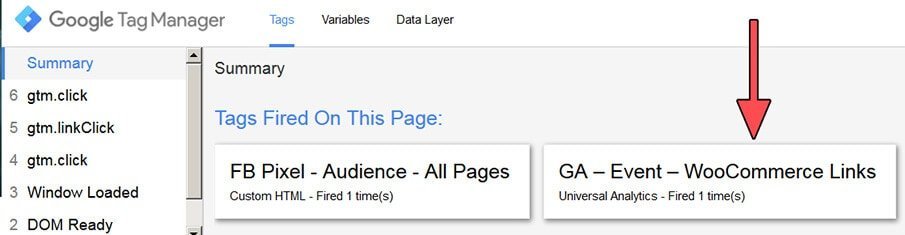
You can also click on the box for more information.
6. Go back to Google Tag Manager and press the red PUBLISH button to make it live on your website.
7. How To Track External Link Clicks
By tracking External Links you are able to see which outbound links are most popular. The process of tracking External Links is very similar to tracking Affiliate Links and WooCommerce Product Links, however, you will be using RegEx (Regular Expression) as a condition.
RegEx is a string of text that allows you to create patterns to help you match, locate, and manage text.
Don’t worry, we are going to keep it extremely simple in this tutorial.
1. Login to Google Tag Manager and click on the container you previously created.
This should take you to the WORKPLACE tab.
2. Click on Triggers and then on the red New button.
3. Give your Trigger a name, I named mine External Link Click.
4. Click on the Trigger Configuration box and then click on Just Links.
5. Tick the options Wait for Tags and Check Validation.
(Screenshot of complete setup below)
6. Under Enable this trigger when all of these conditions are true select Page URL | match RegEx and type .*
By using .* as the RegEx condition it allows us to track every Page URL.
(Screenshot of complete setup below)
7. Under This trigger fires on select Some Link Clicks.
(Screenshot of complete setup below)
8. Under Fire this trigger when an Event occurs and all of these conditions are true select Click URL | Does Not Contain and enter your website domain, PeterStavrou.com for example.
(Screenshot of complete setup below)
If you cannot find Click URL in the drop-down box then you will need to go to Variables and enable it (discussed above).
9. Your Trigger page should look like this:
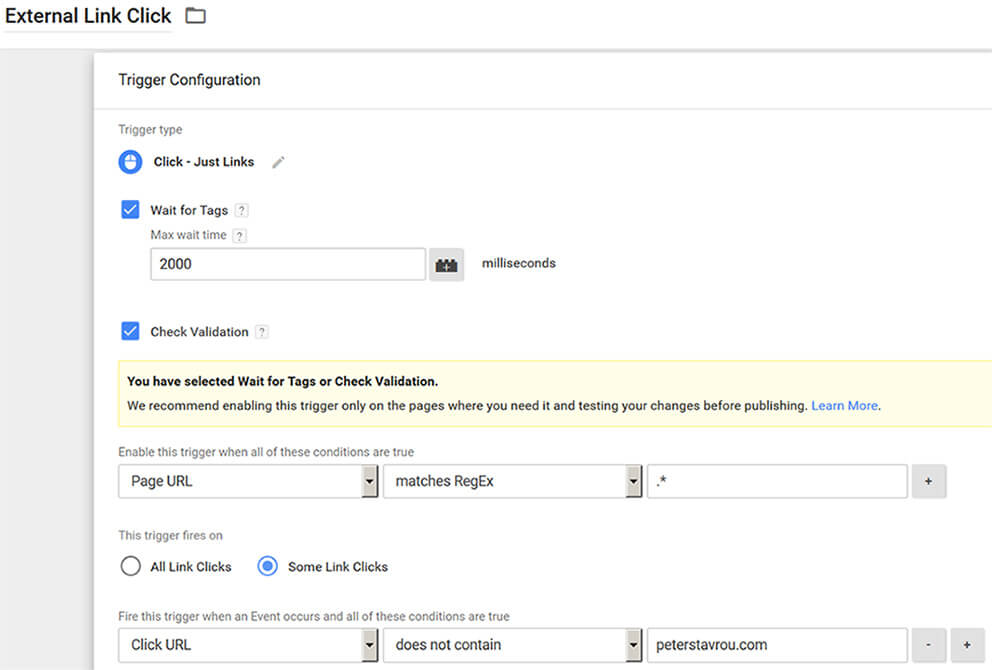
Once you have finished, click the Save button in the top-right corner.
The purpose the Trigger is to allow you to control when and how a Tag runs.
You now need to setup a Tag so that the recorded click gets sent to your Google Analytics account.
1. Click on Tags and then on the red New button.
2. Give your Tag a name, I named mine GA – Event – External Links because we are sending clicks to Google Analytics and we are tracking them using an Event.
3. Click on the Tag Configuration box and select Universal Analytics.
4. Enter your Google Analytics Tracking ID.
Your Tracking ID is the number next to your Property in Google Analytics.
5. Under Track Type select Event.
6. Under Category type External Links.
This is the category name that will be shown in your Google Analytics.
7. Below Action click on the + icon and select Click URL or simply enter {{Click URL}}.
8. Below Label click on the + icon and select Path Path or simply enter {{Page Path}}.
9. Scroll down and click on the Triggering box and select the Trigger you previously created (WooCommerce Links).
![]()
9. You’re setup should now look similar to this:
7.1. Test Your External Link Tracking Setup
1. Click the red down arrow next to the PUBLISH Button.
2. Click on PREVIEW.
3. Open a new Tab and go to a page on your site where you have a link linking to another website.
4. A Google Tag Manager box should pop-up at the bottom of your website.
5. Click on the external link and you should see your Tag appear under Tags Fired On This Page.
This means your External Link tracking is working correctly.
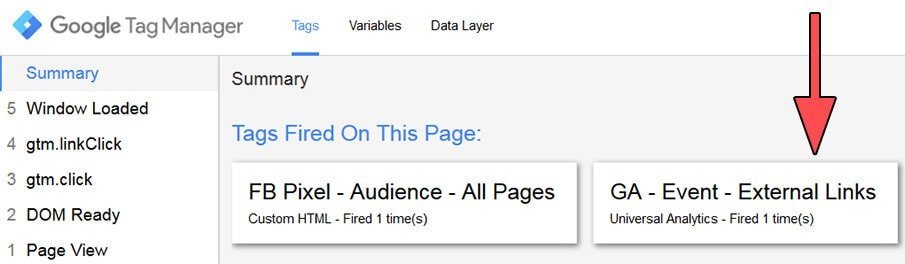
You can also click on the box and you will be provided with more information.
6. Go back to Google Tag Manager and press the red PUBLISH button to make it live on your website.
8. How To Track Any Element
If you haven’t taken a look at any of the guides above then I highly recommend you look at at least one so you get an understanding on how to track links on your website. You will also know how to create Tags, Triggers and how to put your browser in Preview mode which is required to track specific elements.
In this part of the tutorial you will not be tracking links but specific elements or objects.
As an example, I will be tracking the Submit button on all of my opt-in form located on my homepage.
I used the Thrive Leads Plugin to create all of my opt-in forms but you can follow along and use this guide to track any other element on your site.
1. The first thing you need to do is to find the Variables that the element you would like to track uses.
To do this, you will need to enable the PREVIEW mode in Google Tag Manager.
2. Go to a page on your website that has the element you would like to track.
3. If your element does not redirect to a new page or if it opens in a new window then you can simply click on it.
If the element redirects you to a new page when you click on it, you will need to ensure that the link opens in a new window so the data collected from the Preview Tool does not disappear.
To open a link in a new window, you can hold the Ctrl key while clicking on it or you can right-click and select Open Link In New Window.
4. After you have clicked on the element you will notice that on the left-hand side, under Summary, gtm.click has appeared.
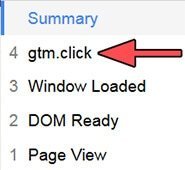
5. Click on it and then click on Variables.
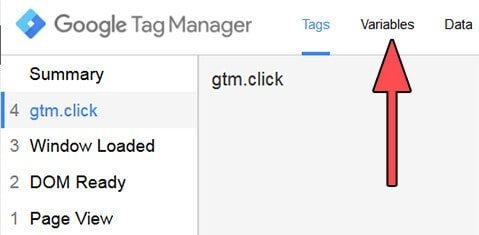
6. You should now see a large list of variables.
You can use these variables to create a Trigger that only executes once your condition is met.
You need to ensure that the variable(s) is unique to the element(s) you would like to track.
In my case, the unique variable for the Submit button is Form Classes and this has a value of ttfm2.

7. Now that you have your unique variable and value, go to Google Tag Manager and click on Triggers.
8. Name your Trigger, I named mine Thrive Leads Button Clicks.
9. Click on the Trigger Configuration box and take a moment to look at the Trigger types so you get an idea of the options available to you.
For this example, I am tracking clicks to a button so I’m going to select All Elements under Click.
10. Under This trigger fires on select Some Link Clicks.
11. Under Fire this trigger when an Event occurs and all of these conditions are true select your unique variable, the condition and enter the value.
My unique variable was Form Classes and it had a value of ttfm2 so I entered.

10. Click the SAVE
Now you need to create the Tag which will be used to send the tracked information to your Google Analytics.
1. Create a new Tag.
2. Name your Tag, I named mine GA – Event – Thrive Lead Button Clicks.
3. Click on the Tag Configuration box and select Universal Analytics.
4. Enter your Google Analytics Tracking ID.
5. Under Track Type select Event.
6. Under Category, enter the Google Analytics category name that you would like to store all your clicks in .
I named mine Thrive Lead Clicks.
7. Below Action click on the + icon and select Click URL or simply enter {{Click URL}}.
8. Below Label click on the + icon and select Path Path or simply enter {{Page Path}}.
9. Scroll down and click on the Triggering box and select the Trigger you created for this Tag.
8.1. Test Your Element Tracking Setup
1. Click the red down arrow next to the PUBLISH Button and click on PREVIEW.
2. Open a new Tab in your browser and navigate to the web page that contains the element you just setup the tracking for.
3. Click on the element (without having it redirect to a new page) and you should see your Tag appear under Tags Fired On This Page.
![]()
9. How To View Tracked Data In Google Analytics
Once people start clicking on the links you are tracking they will appear in Google Analytics after 24 hours.
1. Login to your Google Analytics.
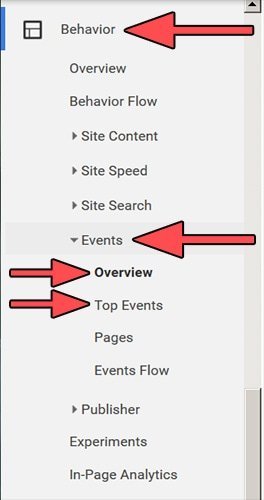
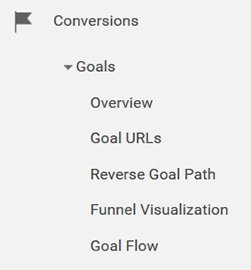
2. Scroll down to Behaviors.
3. Click on Events and the data you are tracking will be under Overview and Top Events.

10. Setting Up Your Tracked Data As Goals
It is a good idea to setup the important data you are tracking as goals as they allow you to measure conversions.
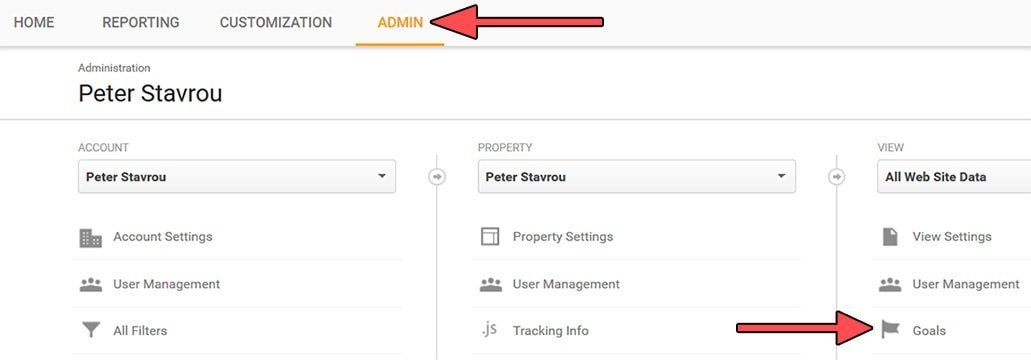
1. Click on Admin and click on Goals
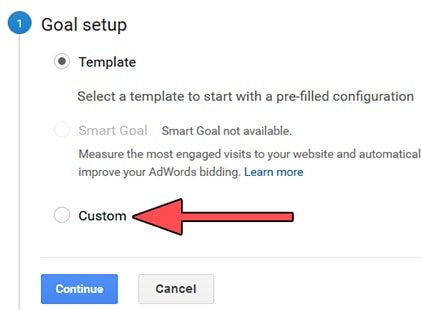
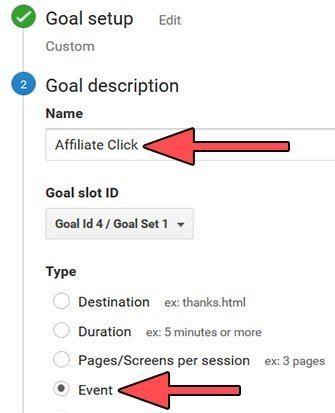
2. Click on the red NEW GOAL button.
3. Select Custom.
4. Name your goal, for example, Affiliate Clicks and select Event.
5. In Category enter the same Category your entered in Google Tag Manager.
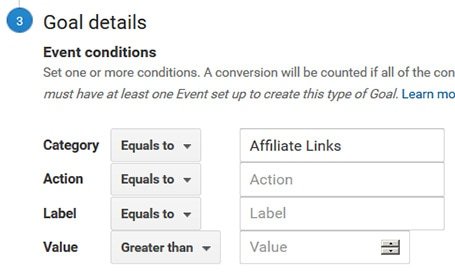
6. Press the blue Save button at the bottom.
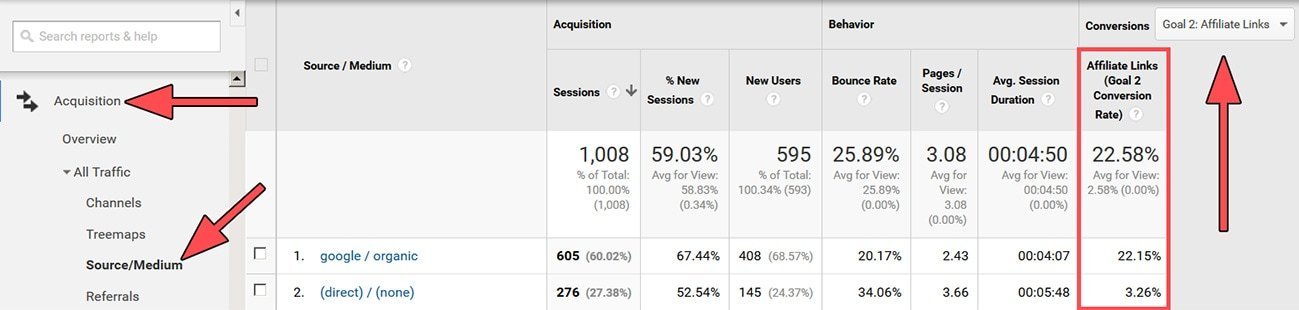
You will now be able to the conversation rate under Conversions and within different areas of your Google Analytics.
Traffic Acquisition Example:
What are you tracking with Google Tag Manager?


Thank you, Peter, for this helpful post.
He helped me set up GTM.
However, if we disable the header of some pages like “shopping cart”, “checkout” or other, will GTM still work?
On the other hand, you mention the setting of the facebook pixel in GTM but without more details. We hope to provide a “How TO” for the facebook pixel as well.
Have a nice day.
My pleasure 🙂
I’m not sure if it will still work if you disable the header, you can test to see if GTM executing using Google’s Tag Assistant extension. If it does not appear when you remove the header then you can add it inside those specific pages manually.
For executing the Facebook Pixel via GTM you can follow this tutorial.
Im using the uncloaked links in thirsty affiliates, im having trouble getting them to track? i have done as above, and it wont work, and i have tracking non thirsty links working. Any ideas?
The above should work fine.
Follow the section with the title “How To Track Affiliate Link Clicks” and simply change the Prefix and it should work.
Just make sure all settings are the same besides the Prefix.
Thank you for this eazy guide.
i have a multi-language page with subdomain, so my aff link looks like this mypage.com/en/goto/ebay or mypage.com/fr/goto/ebay, for English and then French language.
Should i then just but the trigger URL contains “goto” ? or do i need to make a trigger for every language?
goto should be fine because both languages “contain” goto.
Truly, A Good bit of substance! Google Tag Manager is an awesome instrument!
Thanks jack!
Google Tag Manager truly is great! 🙂
Very easy to follow and works perfectly!
Perfect post! Very helpful! Thank you!
Great post! Very useful! Keep them coming!
Amazing article Peter!
Honestly, A Good piece of content! Google Tag Manager is a great tool!
awesome article!
Thanks heaps! glad you enjoyed it 🙂
Amazing post! Absolutely amazing!
Thanks Darren! I’m glad it was helpful.
Holy cow what a great article, i would never dream of getting so into it. LOL. Google Analytics frustrates me beyond belief. again what and outstanding piece for sure. Bravo sir Bravo.
Thanks for the great feedback Fred!
I’m glad you found my article useful 🙂